【UE4C++-ActionRougelike-18】积分系统+持续伤害+物品互动UI
一、积分系统(作业五)
1、创建玩家状态类
以PlayerState为父类创建玩家状态类MyPlayerState,在MyPlayerState中维护玩家积分属性Credits,并提供了用于修改玩家积分的函数。使用委托来处理积分变化时的更新,与绑定导致每一帧都会调用相比,减少性能开销。
//使用基于委托来更新UI要优于直接将Credit绑定到UI上,后者会每一帧调用
DECLARE_DYNAMIC_MULTICAST_DELEGATE_ThreeParams(FOnCreditsChanged, AMyPlayerState*, PlayerState, int32, NewCredits, int32, Delta);
UCLASS()
class ACTIONROGUELIKE_API AMyPlayerState : public APlayerState
{
protected:
    //玩家积分
	int32 Credits;
public:
    //增加玩家的积分 Credits
	UFUNCTION(BlueprintCallable, Category = "PlayerState|Credits") // < Category|SubCategory
	void AddCredits(int32 Delta);
	//减少玩家的积分 Credits
	UFUNCTION(BlueprintCallable, Category = "PlayerState|Credits")
	bool RemoveCredits(int32 Delta);
	//OnCreditsChanged 委托,当玩家积分变化时触发
	UPROPERTY(BlueprintAssignable, Category = "Events")
	FOnCreditsChanged OnCreditsChanged;
};
在MyPlayerState.cpp中实现增加积分和减少积分的方法
void AMyPlayerState::AddCredits(int32 Delta)
{
    // 防止用户添加负数或零
    if (!ensure(Delta > 0.0f))
    {
        return;
    }
    // 增加积分Delta
    Credits += Delta;
    // 触发 OnCreditsChanged 委托中的事件
    OnCreditsChanged.Broadcast(this, Credits, Delta);
}
bool AMyPlayerState::RemoveCredits(int32 Delta)
{
    // 防止用户添加或减去负数或零
    if (!ensure(Delta > 0.0f))
    {
        return false;
    }
    // 如果玩家当前的积分 Credits 小于 Delta,则返回 false
    if (Credits < Delta)
    {
        return false;
    }
    // 减少积分 Delta
    Credits -= Delta;
    // 触发 OnCreditsChanged 委托中的事件
    OnCreditsChanged.Broadcast(this, Credits, -Delta);
    return true;
}
2、实时显示得分
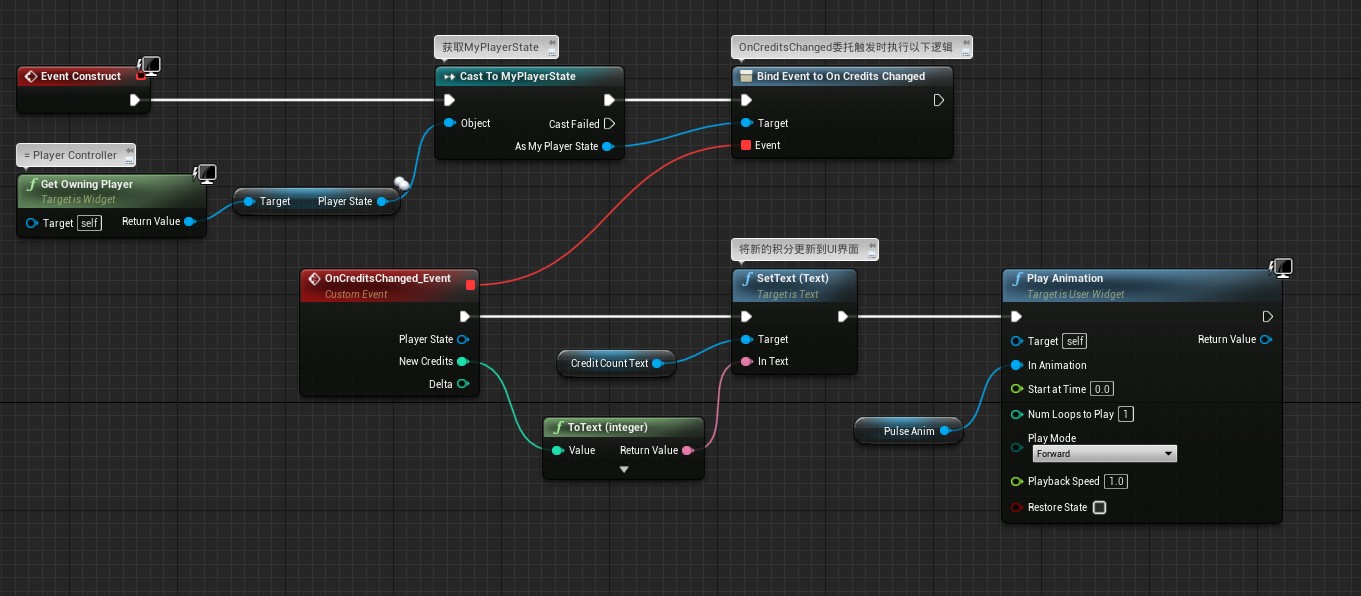
在Credits_Widget中将表示积分值的Text控件设置为变量CreditCountText,在EventGraph中绑定OnCreditsChanged委托触发后执行的逻辑:更新UI,播放积分修改脉冲动画。
3、获取和花费积分
3.1 杀死机器人增加积分
在MyGameMode.h中增加杀死AI的得分奖励值,在MyGameMode.cpp中的OnActorKilled增加杀死目标获得积分的逻辑
//MyGameMode.h
//杀死AI机器人的得分奖励值
UPROPERTY(EditDefaultsOnly, BlueprintReadWrite, Category = "AI")
int32 CreditsPerKill;

//MyGameMode.cpp
void AMyGameModeBase::OnActorKilled(AActor* VictimActor, AActor* Killer)
{
    // 杀死目标获得 Credits
	APawn* KillerPawn = Cast<APawn>(Killer);
	if (KillerPawn)
	{
        // 获取击杀者的 AMyPlayerState 组件,并给予击杀者 Credits 奖励
		if (AMyPlayerState* PS = KillerPawn->GetPlayerState<AMyPlayerState>())
		{
			PS->AddCredits(CreditsPerKill);
		}
	}
}
3.2 拾取健康药水花费积分
在MyPickup_Health.h中增加属性CreditCost表示拾取所需的积分花费,在MyPickup_Health.cpp中的健康药水交互方法Interact_Implementation中在拾取药水钱,需要判断玩家的Credits是否足够支付积分花费。
//MyPickup_Health.h
//拾取所需的积分花费
UPROPERTY(EditAnywhere, Category = "HealthPotion")
int32 CreditCost;
//MyPickup_Health.cpp
void AMyPickup_Health::Interact_Implementation(APawn* InstigatorPawn)
{
	if (!ensure(InstigatorPawn))
	{
		return;
	}
	UMyAttributeComponent* AttributeComp = Cast<UMyAttributeComponent>(InstigatorPawn->GetComponentByClass(UMyAttributeComponent::StaticClass()));
	// 玩家是否满血
	if (ensure(AttributeComp) && !AttributeComp->IsFullHealth())
	{
		if (AMyPlayerState* PS = InstigatorPawn->GetPlayerState<AMyPlayerState>())
		{
			// 如果玩家的 Credits 足够支付 Pickup_Health 的花费,则启用 Pickup,并扣除 Credits
			if (PS->RemoveCredits(CreditCost) && AttributeComp->ApplyHealthChange(this, AttributeComp->GetHealthMax()))
			{
				HideAndCooldownPickup();
			}
		}
	}
}
3.3 拾取硬币增加积分
以MyPickup为父类创建硬币拾取物类MyPickup_Credits,添加属性CreditsAmount表示硬币拾取物能够增加的Credits值。
UCLASS()
class ACTIONROGUELIKE_API AMyPickup_Credits : public AMyPickup
{
protected:
	//Pickup 为玩家增加的 Credits 值
	UPROPERTY(EditAnywhere, Category = "Credits")
	int32 CreditsAmount;
public:
	virtual void Interact_Implementation(APawn* InstigatorPawn) override;
	AMyPickup_Credits();
};
在MyPickup_Credits.cpp中初始化CreditsAmount,在交互接口实现中为交互对象(玩家)增加Credits
AMyPickup_Credits::AMyPickup_Credits()
{
	CreditsAmount = 80;
}

// 实现 Pickup 父类的虚函数,给玩家增加 CreditsAmount 数量的 Credits
void AMyPickup_Credits::Interact_Implementation(APawn* InstigatorPawn)
{
	if (!ensure(InstigatorPawn))
	{
		return;
	}
	if (AMyPlayerState* PS = InstigatorPawn->GetPlayerState<AMyPlayerState>())
	{
		PS->AddCredits(CreditsAmount);
		HideAndCooldownPickup();
	}
}
3.4 效果演示
4、随机生成拾取物
4.1 创建EQS查询
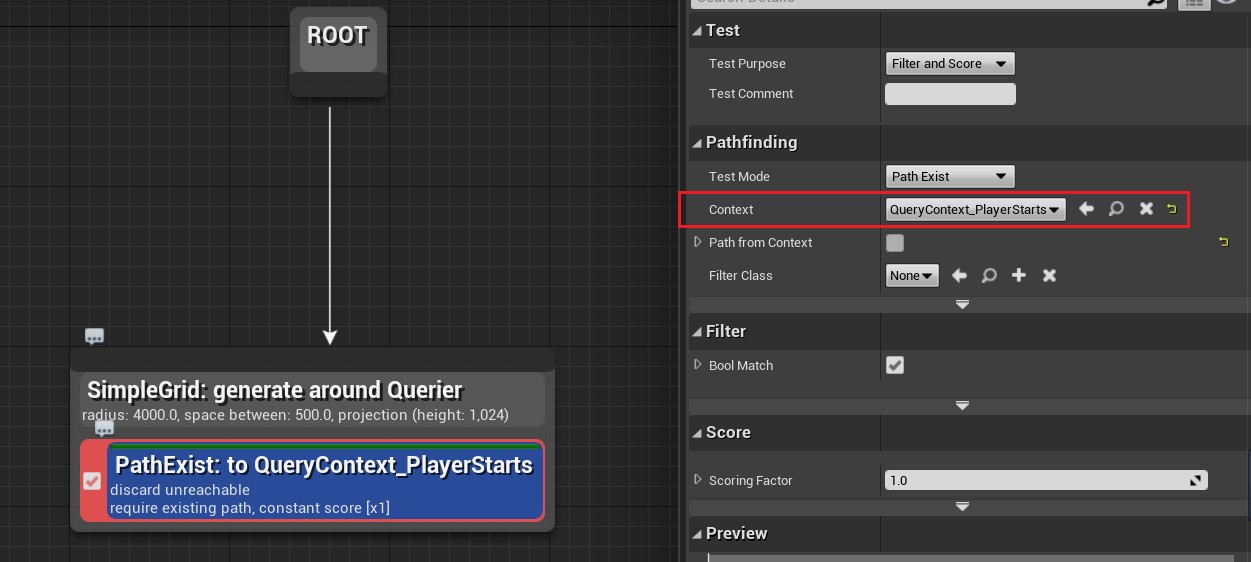
创建EQS查询Query_FindPickupSpawns用于获取拾取物的随机生成地点。这里选用了Grid(方形)来作生成器节点,具体参数可自行设置;添加了PathFinding测试,TestMode设置为PathExist,过滤掉不能抵达的地点;Context设置为自定义Context:玩家开始出生点。
4.2 生成拾取物
在MyGameModeBase.h中添加随机生成拾取物所需的属性和方法。
class ACTIONROGUELIKE_API AMyGameModeBase : public AGameModeBase
{
protected:
	//生成拾取物的EQS查询
	UPROPERTY(EditDefaultsOnly, Category = "Pickups")
	UEnvQuery* PickupSpawnQuery;
	//拾取物类数组
	UPROPERTY(EditDefaultsOnly, Category = "Pickups")
	TArray<TSubclassOf<AActor>> PickupClasses;
	//拾取物之间的间距
	UPROPERTY(EditDefaultsOnly, Category = "Pickups")
	float RequiredPickupDistance;
	//拾取物数量上限
	UPROPERTY(EditDefaultsOnly, Category = "Pickups")
	int32 DesiredPickupCount;
	//拾取物生成回调函数
	UFUNCTION()
	void OnPickupSpawnQueryCompleted(UEnvQueryInstanceBlueprintWrapper* QueryInstance, EEnvQueryStatus::Type QueryStatus);
}
在MyGameModeBase.cpp中添加随时生成道具的逻辑
//游戏开始时随机生成拾取物
void AMyGameModeBase::StartPlay()
{
	Super::StartPlay();
	//设置了一个定时器TimerHandle_SpawnBots,定时调用SpawnBotTimerElapsed()函数,时间间隔为SpawnTimerInterval秒,循环执行
	GetWorldTimerManager().SetTimer(TimerHandle_SpawnBots, this, &AMyGameModeBase::SpawnBotTimerElapsed, SpawnTimerInterval, true);

	// 确保至少有一个掉落物类
	if (ensure(PickupClasses.Num() > 0))
	{
		// 运行环境查询系统(EQS)来查找潜在的掉落物生成位置
		UEnvQueryInstanceBlueprintWrapper* QueryInstance = UEnvQueryManager::RunEQSQuery(this, PickupSpawnQuery, this, EEnvQueryRunMode::AllMatching, nullptr);
		if (ensure(QueryInstance))
		{
            //将当前对象绑定到查询完成事件,查询完成后会调用 OnPickupSpawnQueryCompleted() 函数。
			QueryInstance->GetOnQueryFinishedEvent().AddDynamic(this, &AMyGameModeBase::OnPickupSpawnQueryCompleted);
		}
	}
}
//随机生成拾取物
void AMyGameModeBase::OnPickupSpawnQueryCompleted(UEnvQueryInstanceBlueprintWrapper* QueryInstance, EEnvQueryStatus::Type QueryStatus)
{
	 // 如果 EQS 查询失败,打印警告日志并退出函数
	if (QueryStatus != EEnvQueryStatus::Success)
	{
		UE_LOG(LogTemp, Warning, TEXT("Spawn bot EQS Query Failed!"));
		return;
	}
	// 获取 EQS 查询结果中的所有位置
	TArray<FVector> Locations = QueryInstance->GetResultsAsLocations();
	// 用于记录已使用的位置,便于后面检查位置间距
	TArray<FVector> UsedLocations;
	//道具数量
	int32 SpawnCounter = 0;
	// 如果还没有生成足够数量的道具且仍有可用位置,则继续生成道具
	while (SpawnCounter < DesiredPickupCount && Locations.Num() > 0)
	{
		// 从剩余的位置中随机选取一个位置
		int32 RandomLocationIndex = FMath::RandRange(0, Locations.Num() - 1);
		FVector PickedLocation = Locations[RandomLocationIndex];
		// 将已选位置从数组中删除,避免重复选取
		Locations.RemoveAt(RandomLocationIndex);

		// 检查位置间距是否符合要求
		bool bValidLocation = true;
		for (FVector OtherLocation : UsedLocations)
		{
			float DistanceTo = (PickedLocation - OtherLocation).Size();

			if (DistanceTo < RequiredPickupDistance)
			{
				bValidLocation = false;
				break;
			}
		}
		// 如果位置间距不符合要求,跳过该位置
		if (!bValidLocation)
		{
			continue;
		}
		// 随机选取一种道具类别
		int32 RandomClassIndex = FMath::RandRange(0,PickupClasses.Num() - 1);
		TSubclassOf<AActor> RandomPickupClass = PickupClasses[RandomClassIndex];
		// 在随机位置生成道具
		GetWorld()->SpawnActor<AActor>(RandomPickupClass, PickedLocation, FRotator::ZeroRotator);
		// 记录该位置,便于后面检查位置间距
		UsedLocations.Add(PickedLocation);
		SpawnCounter++;
	}
}
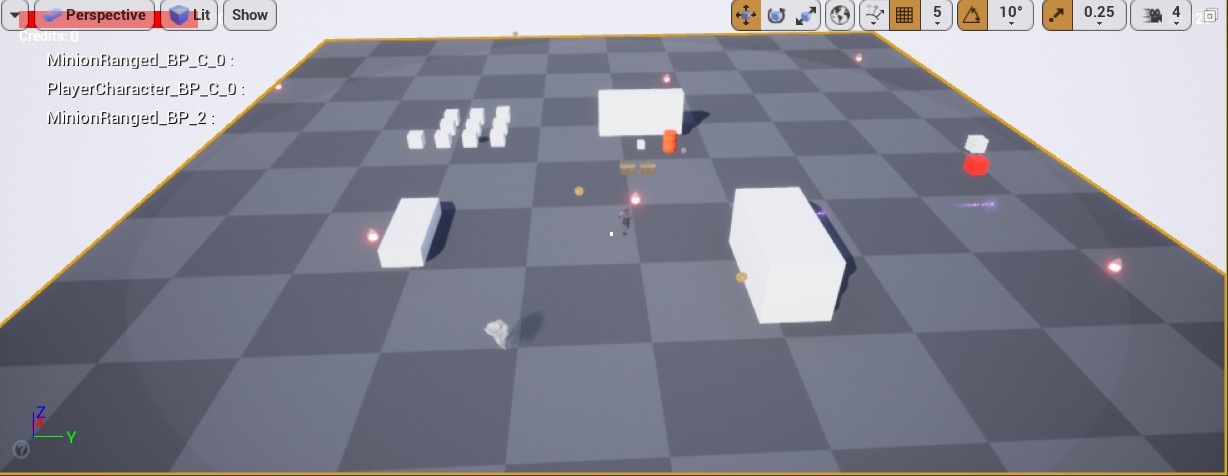
4.3 效果演示
二、持续伤害效果
1、创建持续效果能力类
以MyAction为父类创建持续效果能力类MyActionEffect。添加Duration和Period以及对应定时器句柄用来控制持续效果的持续时间和间隔时间。
UCLASS()
class ACTIONROGUELIKE_API UMyActionEffect : public UMyAction
{
	GENERATED_BODY()
public:
	void StartAction_Implementation(AActor* Instigator) override;
	void StopAction_Implementation(AActor* Instigator) override;
protected:
	// 持续时间
	UPROPERTY(EditDefaultsOnly, BlueprintReadOnly, Category = "Effect")
	float Duration;
	// 间隔时间
	UPROPERTY(EditDefaultsOnly, BlueprintReadOnly, Category = "Effect")
	float Period;
	// 定时器句柄,用于管理两次效果应用之间的时间间隔
	FTimerHandle PeriodHandle;
	// 定时器句柄,用于管理效果的持续时间
	FTimerHandle DurationHandle;
    // 执行持续期间效果
	UFUNCTION(BlueprintNativeEvent, Category = "Effect")
	void ExecutePeriodicEffect(AActor* Instigator);
public:
	UMyActionEffect();
};
在MyActionEffect.cpp中实现持续效果开始和结束函数。
UMyActionEffect::UMyActionEffect()
{
	bAutoStart = true;
}
void UMyActionEffect::StartAction_Implementation(AActor* Instigator)
{
	Super::StartAction_Implementation(Instigator);
	// 如果持续时间大于0,设置持续时间并在到达时间后停止动作
	if (Duration > 0.0f)
	{
		// 创建一个计时器,计时器结束时调用 StopAction 函数
		FTimerDelegate Delegate;
		Delegate.BindUFunction(this, "StopAction", Instigator);
		GetWorld()->GetTimerManager().SetTimer(DurationHandle, Delegate, Duration, false);
	}
	// 如果周期时间大于0,设置周期并在每个周期上执行 ExecutePeriodicEffect() 函数
	if (Period > 0.0f)
	{
		// 创建一个周期性计时器,每周期结束时调用 ExecutePeriodicEffect 函数
		FTimerDelegate Delegate;
		Delegate.BindUFunction(this, "ExecutePeriodicEffect", Instigator);
		GetWorld()->GetTimerManager().SetTimer(PeriodHandle, Delegate, Period, true);
	}
}
void UMyActionEffect::StopAction_Implementation(AActor* Instigator)
{
	// 如果上一个周期已经完成,执行最后一个周期
	if (GetWorld()->GetTimerManager().GetTimerRemaining(PeriodHandle) < KINDA_SMALL_NUMBER)
	{
		ExecutePeriodicEffect(Instigator);
	}
	// 父类的停止动作函数
	Super::StopAction_Implementation(Instigator);
	// 清除计时器
	GetWorld()->GetTimerManager().ClearTimer(PeriodHandle);
	GetWorld()->GetTimerManager().ClearTimer(DurationHandle);
	// 从拥有此动作的组件中删除此动作
	UMyActionComponent* Comp = GetOwningComponent();
	if (Comp)
	{
		Comp->RemoveAction(this);
	}
}
void UMyActionEffect::ExecutePeriodicEffect_Implementation(AActor* Instigator)
{
	// 实现周期性效果的函数,需要在子类中具体实现
}
注:这里在MyActionComponent中需要添加RemoveAction方法
//MyActionComponent.h
UFUNCTION(BlueprintCallable, Category = "Actions")
void RemoveAction(UMyAction* ActionToRemove);
//MyActionComponent.cpp
void UMyActionComponent::RemoveAction(UMyAction* ActionToRemove)
{
	// 检查 ActionToRemove 是否存在且未运行
	if (!ensure(ActionToRemove && !ActionToRemove->IsRunning()))
	{
		return;
	}
	// 从 Actions 数组中移除 ActionToRemove
	Actions.Remove(ActionToRemove);
}
2、创建持续伤害效果类
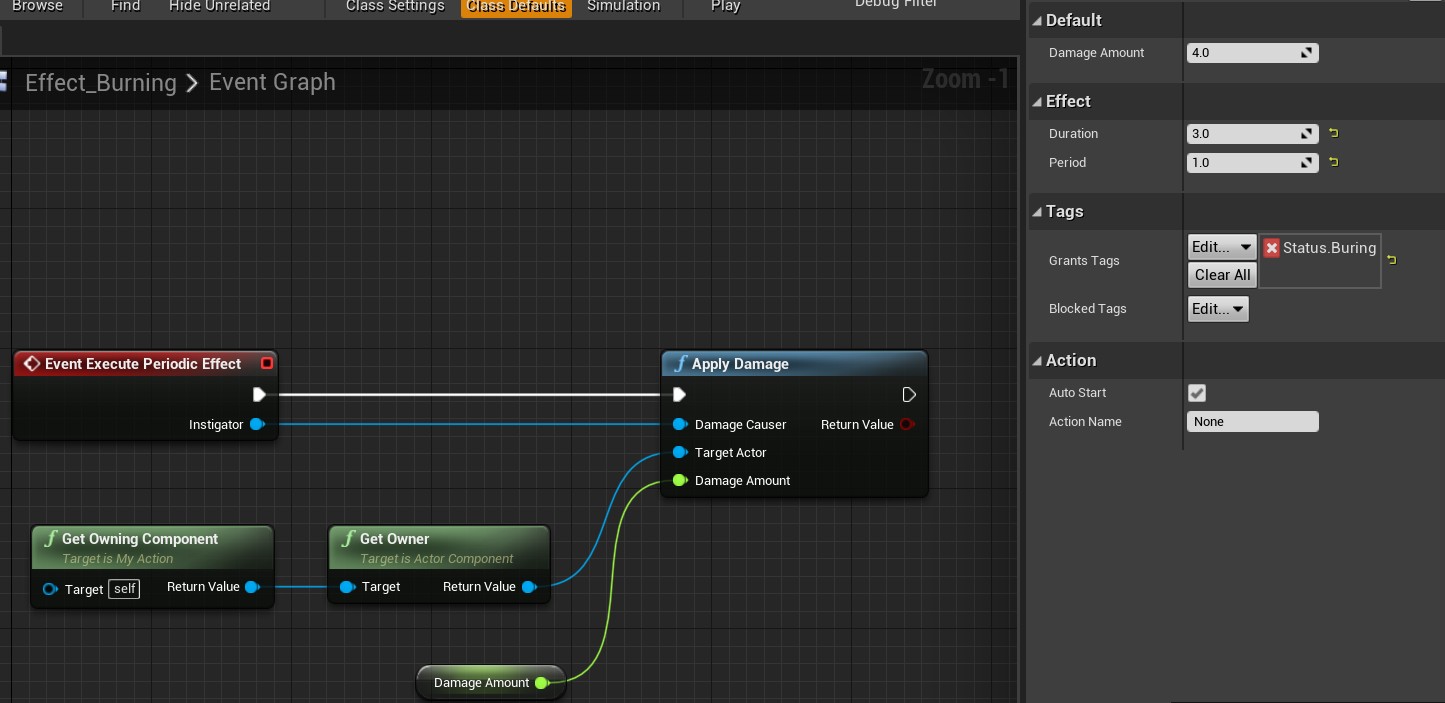
以MyActionEffect为父类创建持续伤害类蓝图类Effect_Burning。在Effect_Burning蓝图中实现父类中的ExecutePeriodicEffect方法,具体逻辑为造成伤害。设置持续时间和周期时间,并且设置GameplayTag为Buring。
3、应用持续伤害效果
在MyMagicProjectile.h中添加BurningActionClass来表示持续伤害效果类
在MyMagicProjectile.cpp中OnActorOverlap方法中,应用伤害后增加持续伤害效果类Action。
//MyMagicProjectile.h
UPROPERTY(EditDefaultsOnly, Category = "Damage")
TSubclassOf<UMyActionEffect> BurningActionClass;
//MyMagicProjectile.cpp中的OnActorOverlap方法内
if (UMyGameplayFunctionLibrary::ApplyDirectionalDamage(GetInstigator(), OtherActor, DamageAmount, SweepResult))
{
    Explode();
    if (ActionComp && BurningActionClass && HasAuthority())
    {
        ActionComp->AddAction(GetInstigator(), BurningActionClass);
    }
}
最后在MagicProjectile_BP设置BurningActionClass为Effect_Burning。
4、效果演示
三、改进物品互动UI
1、寻找可交互对象
在SInteractionComponent中添加AActor变量FocusedActor用来表示当前被玩家注视的物品,FindBestInteractable用来查找当前可以交互的对象;DefaultWidgetClass表示当前显示物品互动UI的Widget类
UCLASS(ClassGroup = (Custom), meta = (BlueprintSpawnableComponent))
class ACTIONROGUELIKE_API USInteractionComponent : public UActorComponent
{
public:
    USInteractionComponent();
    // 主动交互函数
    void PrimaryInteract();
protected:
    virtual void BeginPlay() override;
    // 查找最佳可交互对象
    void FindBestInteractable();
    // 当前焦点对象
    UPROPERTY()
    AActor* FocusedActor;
    // 跟踪射线的距离
    UPROPERTY(EditDefaultsOnly, Category = "Trace")
    float TraceDistance;
    // 跟踪射线的半径
    UPROPERTY(EditDefaultsOnly, Category = "Trace")
    float TraceRadius;
    // 跟踪射线的碰撞通道
    UPROPERTY(EditDefaultsOnly, Category = "Trace")
    TEnumAsByte<ECollisionChannel> CollisionChannel;
    // 默认用户界面类
    UPROPERTY(EditDefaultsOnly, Category = "UI")
    TSubclassOf<UMyWorldUserWidget> DefaultWidgetClass;
    // 默认用户界面实例
    UPROPERTY()
    UMyWorldUserWidget* DefaultWidgetInstance;
public:
    virtual void TickComponent(float DeltaTime, ELevelTick TickType, FActorComponentTickFunction* ThisTickFunction) override;
};
在SInteractionComponent.cpp中实现FindBestInteractable。步骤为:遍历所有可交互对象,获取第一个实现了 USGameplayInterface 接口的对象,将该对象设置为FocusedActor,创建Widget实例附着到FocusedActor上。
// 查找最佳可交互对象
void USInteractionComponent::FindBestInteractable()
{
	// 获取调试绘制交互状态的开关值
	bool bDebugDraw = CVarDebugDrawInteraction.GetValueOnGameThread();
	// 添加要查询的对象类型
	FCollisionObjectQueryParams ObjectQueryParams;
	ObjectQueryParams.AddObjectTypesToQuery(CollisionChannel);
	// 获取视点位置和旋转
	AActor* MyOwner = GetOwner();
	FVector EyeLocation;
	FRotator EyeRotation;
	MyOwner->GetActorEyesViewPoint(EyeLocation, EyeRotation);
	FVector End = EyeLocation + (EyeRotation.Vector() * TraceDistance);

	TArray<FHitResult> Hits;
	FCollisionShape Shape;
	Shape.SetSphere(TraceRadius);
	// 执行射线检测,获取所有可交互对象
	bool bBlockingHit = GetWorld()->SweepMultiByObjectType(Hits, EyeLocation, End, FQuat::Identity, ObjectQueryParams, Shape);
	// 根据检测结果设置调试绘制的颜色
	FColor LineColor = bBlockingHit ? FColor::Green : FColor::Red;
	// 清空焦点对象引用
	FocusedActor = nullptr;
	// 遍历所有可交互对象,获取第一个实现了 USGameplayInterface 接口的对象
	for (FHitResult Hit : Hits)
	{
		if (bDebugDraw)
		{
			DrawDebugSphere(GetWorld(), Hit.ImpactPoint, TraceRadius, 32, LineColor, false, 2.0f);
		}

		AActor* HitActor = Hit.GetActor();
		if (HitActor)
		{
			// 如果HitActor可以被交互,令FocusedActor为当前HitActor
			if (HitActor->Implements<USInteractionInterface>())
			{
				FocusedActor = HitActor;
				break;
			}
		}
	}
	// 如果存在焦点对象,则创建或更新用户界面
	if (FocusedActor)
	{
         // 如果不存在控件实例且DefaultWidgetClass存在,创建控件实例DefaultWidgetInstance
		if (DefaultWidgetInstance == nullptr && ensure(DefaultWidgetClass))
		{
			DefaultWidgetInstance = CreateWidget<UMyWorldUserWidget>(GetWorld(), DefaultWidgetClass);
		}
		if (DefaultWidgetInstance)
		{
             //控件实例附着在FocusedActor上
			DefaultWidgetInstance->AttachedActor = FocusedActor;
			if (!DefaultWidgetInstance->IsInViewport())
			{
				DefaultWidgetInstance->AddToViewport();
			}
		}
	}
	// 否则移除用户界面
	else
	{
		if (DefaultWidgetInstance)
		{
			DefaultWidgetInstance->RemoveFromParent();
		}
	}
	if (bDebugDraw)
	{
		DrawDebugLine(GetWorld(), EyeLocation, End, LineColor, false, 2.0f, 0, 2.0f);
	}
}

void USInteractionComponent::PrimaryInteract()
{
	if (FocusedActor == nullptr)
	{
		GEngine->AddOnScreenDebugMessage(-1, 1.0f, FColor::Red, "No Focus Actor to interact.");
		return;
	}
	APawn* MyPawn = Cast<APawn>(GetOwner());
	ISInteractionInterface::Execute_Interact(FocusedActor, MyPawn);
}
2、创建物品互动UI
以MyWorldUserWidget为父类创建蓝图类DefaultInteraction_Widget,并设置好交互UI布局
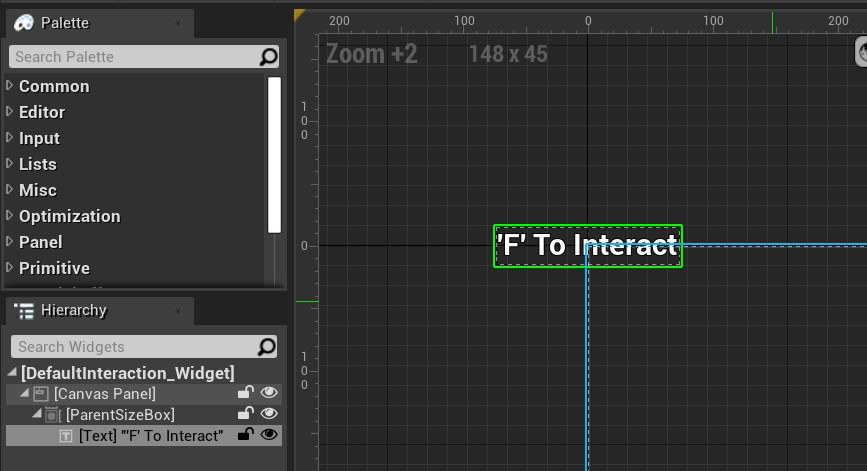
并在PlayerCharacter_BP中的InteractionComp中设置DefaultWidgetClass为DefaultInteraction_Widget。
3、效果演示


